Tips and tools for making your online meetings and workshops more interactive
By Sawsan Khuri and Mark Reed · 1 Oct 2020 · 9 min read
We all miss the real life interaction, the smell of that coffee and the sound of that buzz as you walk into a meeting room. At the same time, many of us are finding that working online is often more productive that in-person meetings, there is less faff and more focus. Now that the novelty has worn off, and that it is likely to be a very long time before we might return to in-person events, many of us are looking for ways to make our online events more relaxed and interactive, more real.
So first, the tools…
What are people using for online meetings? We found that there are about 27 different tools out there for running online events. We focused on those that would be best suited for meetings of small groups, and those for running interactive workshops small to medium sized groups. So we were not looking at webinar tools or polling tools, nor have we included Hopin which is an excellent platform for running conferences. Here are the 20 tools we looked at:

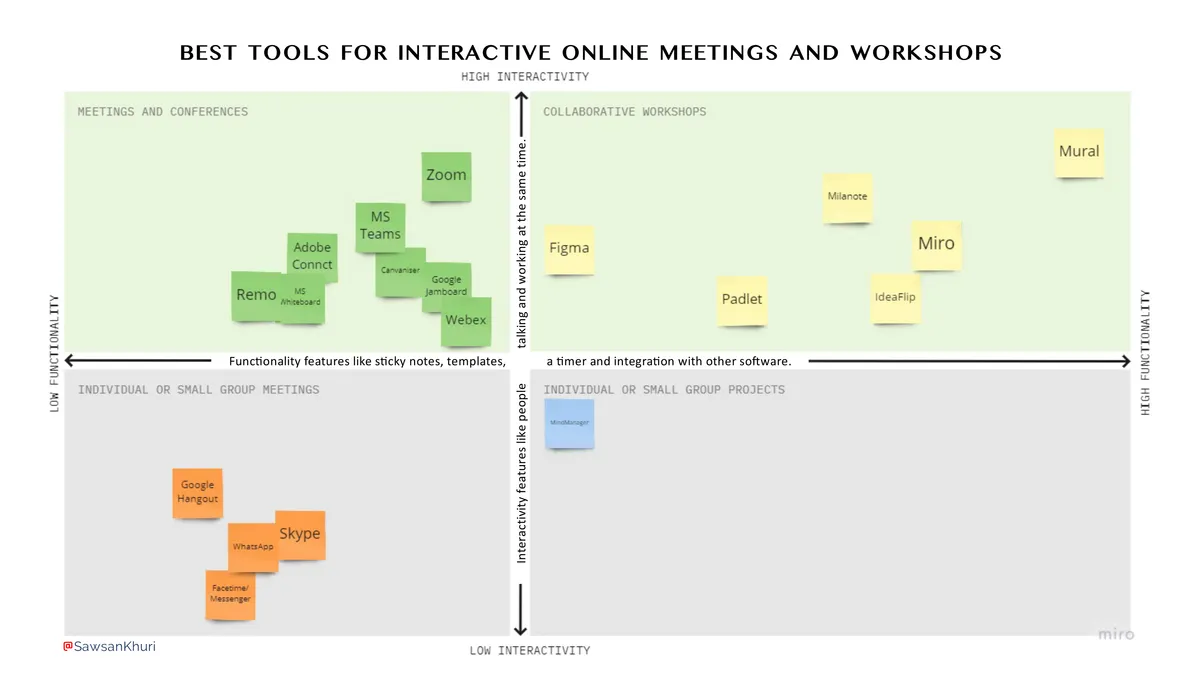
Next, we came up with a system of scoring these tools according to their interactivity and functionality. The interactivity score looked at features such as how many people could see each other and interact on the whiteboard at the same time, and whether you could form breakout rooms. Functionality scores were based on availability and type of sticky notes, what you could do with them, availability of templates to work from and the general user-friendliness of the tool in terms of how long it took a participant to learn how to navigate and use the tool.
In summary, we concluded that Facetime, WhatsApp and Skype were best for individual meetings or small groups, and that Zoom is best for interactive meetings. What was useful to learn was that not all online whiteboard apps were equal. Jamboard, Canvaniser and the whiteboard functionality on Zoom came out with much lower functionality scores than tools such as Padlet, Miro and Mural. All of them have sticky note options, and it was the options for colour, size and what you can do with the sticky notes and how many people can be typing in at the same time which did it. In fact Mural scored so much better than all the rest on its facilitated whiteboard functionality that it skewed our graph right out. By the way, we own no part nor do we get any commission from any of these tools! Now you’ve got your tools, what can you do with them?
Running your online meetings
1. The most important thing we realised early on is you don’t have to only use one tool per meeting or workshop. It is fairly straightforward to layer things up, and we like pairing up Zoom or MS Teams with Mural, Miro, Padlet or JamBoard, depending on the type of meeting or workshop we are facilitating. You can share the whiteboard link in the Zoom or MS Teams chat, and everyone clicks on it and meets you there in seconds. Do a quick demo and you’re off. You stay connected and talking on Zoom or MS Teams, and work together on the whiteboard. It adds a bit of fun to meetings, and allows much more interactive, productive sessions. You can use this in a variety of ways:
a. When simply asking people to provide feedback or ideas, or answer a question that could have many different answers.
b. You can prepare worksheets on these whiteboard tools ahead of time and participants can work on them to add ideas, answer questions and set priorities.
c. You can use one of the templates available on some of them. There are hundreds and vary from world maps to timelines, priority setting, strategy planning and more.
2. Ensure good audio and video quality to reduce the cognitive burden on participants. Invest in good lighting, a daylight lamp is a good idea for a cloudy day or after dark.
3. Consider what your background tells participants on a subconscious level. Books or a neutral background are usually preferred, a bright coloured accent wall or studio behind you tells everyone you’re creative, but a messy office space may not invoke the best impression!
4. Dress as you would if you were running the meeting or workshop in person, perhaps minus the work shoes if you’re working from home. It makes a difference in how you project yourself and that comes across to participants.
5. Make sure you have eye contact with the group by positioning the image of yourself at the top of the screen next to your camera and speaking to yourself - seeing you give yourself eye contact is a good reminder of what it looks like when you do this, compared to looking out over the top of the screen, for example. This also enables you to keep body language in shot and be sure you are in frame and well-lit.
6. On screen, you might need to slightly exaggerate body language and intonation to communicate passion and bring the audience with you.
Starting the meeting
7. Once you open Zoom or MS Teams, get everyone using the chat right from the start by doing your introductions there. This also saves meeting time, especially with large numbers.
8. Encourage everyone to keep the conversation going on the chat in parallel, so people can reflect and discuss as you go, and you have a bank of comments and questions to dive into when you break for discussion.
9. Icebreakers are a must. Here are some ideas:
a. A simple one is to have a “show and tell” of, for example, the coffee or tea mug people are using or any item from their desk.
b. After the initial quick hello from you, go straight to random paired breakout rooms in Zoom telling everyone they have 1 minute to introduce themselves to their neighbour and then they have to swap so the other person introduces themselves. Broadcast a message after 1.5 minutes, giving them 3 mins in total. When they come back to the main room, they have to introduce their neighbour in the chat. They say “you haven’t arrived at a meeting until you’ve spoken”, well this way everyone has spoken and you’ve only used about 5 minutes of your meeting time.
c. Get people to show what they’re wearing on their feet to the camera and write in the chat whose shoes, socks or slippers they would like to swap with. It is a bit of fun, but then ask them what word we’ve just exemplified with this activity: it is of course “empathy” - putting yourself in someone else’s shoes.
d. Have everyone turn their cameras off, and then bring them in with questions such as “turn your camera on if you had cereal for breakfast” or “turn your camera on if you own a pet”. This is a variation on a standup/sit-down ice breaker, and works really well online. You can choose questions that match the theme of your workshop to get everyone into that space with you during the icebreaker.
10. Create a safe space for people by not requiring everyone to turn on their cameras. Some people have very good reasons, from low bandwidth at their location to traumatic experiences which prevent them from wanting to turn their cameras on. They can be gently encouraged to turn them on in breakout room sessions, if they feel comfortable doing so.
Presenting material
11. If you have material to present, break it into smaller chunks than you would an in-person presentation, and add activities such as polling or discussion points in between. With some groups you might have another icebreaker activity mid-way through, just to break up the monotony of a presentation.
12. Encourage discussion by getting every single person to write something in the chat, as a reflection or learning point, action or question.
13. Remember to pause and give people time to think and type. Encourage the group to read the points their colleagues have written, asking if they might do one of the actions suggested in the chat, or if they agree or not with an opinion. If you have time, invite people to discuss via open mic, but if nobody wants to, value the chat and encourage more engagement and interaction there. The result can be rich, and when saved and sent after the workshop, can be a valuable resource of links, ideas and more information.
14. Take longer breaks than you would an in-person event to give people time to make their own tea/coffee or exercise, and give people the opportunity to interact during the break if they want to use it as a networking opportunity. Ask them to keep their camera on and unmute themselves if they want to chat to others over the break. If they want a private break, they can turn their camera off, mute their mic and turn their volume down.
15. Retain balance between speaker view and slides, especially on slides where you speak for more than 20-30 seconds, to retain visual interest and eye contact with the group. It is reasonably easy to toggle between screen share and speaker view on most tools.
Mix up your modes of interaction
16. Have fun with sticky notes using one of the whiteboard tools we mentioned earlier. Once ideas start coming in, help move the sticky notes around the board so you can cluster similar ideas together. If you get a lot of sticky notes, you might need to reduce their size once they’re clustered. Use the pen to circle clusters and add a text box to provide a summary label. If you run out of time you can just verbally summarise the discussion, but the visual impact of all those sticky notes will be worth it.
17. You can use something like Google Sheets (or MS Excel) if you want to get more structured feedback from the group. Pop the link in the chat and join everyone there to start populating ideas in different columns or cells of a grid you’ve pre-prepared. You might use cluster summaries from the Jamboard to create column headers and then ask people to write actions or more specific ideas under each of these columns.
For larger groups, do this in separate breakout rooms. Each breakout room has the same link and adds their ideas simultaneously, or you can have separate files or boards per breakout room. Suggest that they look at what others have added to avoid just repeating ideas.
18. Preparing structured worksheets or whiteboard templates for breakout room discussions is really worthwhile. You can do this on Miro, Mural and other whiteboard apps. This keeps people engaged and makes it feel more real, like flipchart activities.
19. As well as using polling to add interactivity to a presentation, you can include a voting activity once you’ve clustered ideas. You can do this directly on the better whiteboard apps, or by transferring your top ideas into a polling activity on Zoom or Mentimeter (which can also ask open ended questions) to find out which idea they preferred.
20. For some workshops, get people to write or draw on paper, for example making a pie chart or drafting an infographic, and they can then either photograph it and share via chat, or show it via share screen, or simply hold it up to the camera.
Breakout rooms
21. When you’ve assigned people to breakout rooms, remember they are not tethered to them. If someone prefers to discuss a different theme, or if you find the diversity balance in one breakout room needs adjusting, go ahead and assign people to different breakout rooms.
22. When creating breakout rooms, be careful to create a number of groups that you will be able to visit in the time you’ve provided for the breakout session. You should check in at least once per group to see if they need any help. Come in on mute, and make it clear you’ll do this in advance, so people can ignore you and you don’t disrupt the discussion.
23. If you’re not recording the discussion either on audio or on a document during the breakout session, get everyone to write something they learned from the discussion in the chat when they return to the main room.
Wrap Up
24. Just as with in-person events, it is very important to wrap up at the end with a summary of main take away messages from the session, and any calls to action that are relevant to the group. Even if this is a hurried 30 seconds at the end because you ran out of time having fun with sticky notes (it happens to the best of us), this is important.
25. Make sure everyone knows how to contact you if they need to after the workshop, and encourage follow up and feedback.
26. As the host of the meeting, when you end the call everyone drops off. Sometimes if you do that too quickly people feel kicked out, so it is courteous to wait till most people have left before doing that, and you will be the best judge of when to end that call.
Finally, try to enjoy yourself. There are tremendous learnings from online work and we are all newbies to this. If you are confident and relaxed, your participants will immediately relax with you and you can get a lot more out of your online event.
Some other good guides on interactive online workshops:
- Better online meetings by Dialogue Matters
- Facilitating online workshops by Andrew Scott
- How to make people like you – virtually by Zaria Gorvett
- The definitive guide to facilitating online workshops by Mural
*Sawsan Khuri (PhD FHEA FRSA) is a professional facilitator of collaborative innovation at Collaborative Capacities. With a cross-disciplinary scientific background and a foot in academia, she is known for going beyond traditional boundaries and allowing solutions to emerge from the collective intelligence at meetings and workshops. Her work is inclusive, creative and focused on outcomes, for both academia and business, using a systems based, human centric approach. *
Stay up to date
Keep up with new resources, free training and recent thinking on research impact.